• Home
  • About
  • Contact
  • Blog
  • Nav Social Icons

  • Skip to primary navigation
  • Skip to main content
  • Skip to primary sidebar
  • Home
  • Organisation
  • Meal Planning
  • Budgeting
  • Recipes
  • Mom Essentials
  • Parenting
  • DIY & Decor
  • Free Printables
  • About
  • Blog
  • Nav Social Icons

The Mindful Homemaker
  • Organisation
    • All Organisation Posts
    • Bathroom Organisation ideas
    • Bedroom Organisation Ideas
    • Home Office Organisation
    • Kitchen Organisation Ideas
    • Organisation Ideas for small Closets
    • Kids Organisation
    • Pantry Organisation
    • Laundry Room Organisation
    • Living Room Organisation
    • Mudroom / Entryway Organisation
  • Meal Planning
  • Budgeting
  • Recipes
  • Mom Essentials
    • Creativity and Leisure
    • Daily Mom Routine
    • Mom Outfit Ideas
    • Self Care
  • Parenting
  • DIY & Decor
    • Spring
    • Summer
    • Autumn
    • Winter
  • Time-Management
  • Free Printables
    • Planners and Lists
      • To Do Lists
      • Daily Planners
      • Weekly Planners
      • Monthly Planners
      • Goal Trackers
    • Budget and Finance Planners
      • Budget Tracker
      • Expense Tracker
      • Savings Tracker
    • Homemaking and Meal Planning
      • Freezer Inventory
      • Grocery Shopping
      • Home Management Binders
      • Meal planners
      • Pantry Inventory
    • Kids Printables
      • Bedtime Routines
      • Chore Charts
    • 2026 Calendars
  • Nav Social Icons

DIY & Decor, Spring · November 20, 2025

Spring Moss Decor Hot Glue Mushrooms

Spread the love

I absolutely loved making this spring home decor with hot glue mushrooms. It was so easy to make and almost everything I used was already at home. So this was super affordable.

Jump to DIY
spring moss decor hot glue mushrooms

This post is all about Spring Moss Decor Hot Glue Mushrooms

Spring always inspires me to create something new and something colourful. After the long winter, it feels good to celebrate with nature. I created a small DIY spring home decor using commonly found items.

I already had the wooden disk from my father in law’s tree. The moss was collected on one of our regular forest walks. The only thing I bought was the string of LED lights at a discount store.

moss crafts
moss tablescape
moss projects

To start, lay out a sheet of baking paper or parchment paper on a flat surface. Using the Hot glue gun, create small discs on the sheet. Create as many as there are the individual lights on the LED string. Allow to cool.

Once cooled, Wipe off any dust or dirt on the wooden piece and hot glue the string of lights on it. Since my wooden piece was round, I hot glued them in a circular pattern. Allow to cool.

moss table decor
spring decorations moss
moss spring decor

Hot glue the bodies and tops of the individual LED lights and attach the small discs to them. Now our Mushrooms are ready.

Continue attaching the discs to the lights. Add hot glue to the wooden piece and fix the moss onto it. Cover the bases of the individual LED lights well to conceal the hot glue.

DIY mushroom lights
spring decor with moss

You can use this as a whimsical tablescape or as garden decor. If using outside, be sure to protect the batteries from rain and the morning dew.

I’d love to hear your thoughts on making this Spring Moss decor.

Print Recipe
spring decor with moss
Print

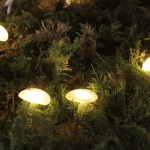
Spring Moss Decor with Hot Glue Mushroom Lights

This DIY is perfect for Spring with it's whimsical Moss and mushroom lights.
Prep Time1 hour hr
Keyword: Spring Moss Decor

Equipment

  • 1 Hot glue gun
  • 1 String of LED lights Should be as long as can fit on the wooden piece. I used a 1 meter length.

Materials

  • 1 Wooden tray or piece of wood. I already had a wooden disk, so I used that.
  • 1 Sheet of Baking paper
  • 200g Natural Moss I got mine from our forest walks, but many craft stores have them.

Instructions

  • Lay out your baking sheet on a flat surface
  • Use your hot glue to create small disks on the baking paper.
  • Allow to cool.
  • Wipe off any dust from your wooden piece.
  • Hot Glue the LED lights in a circle on your wooden Piece
  • Allow to cool.
  • Once cooled, hot glue the LED lights themselves. Don't worry, they won't burn.
  • Add the little disks we made earlier to the tops of those LED lights. Allow to cool.
  • Now, add hot glue onto the wooden piece itself.
  • Stick the moss and make sure it has attached well to the glue.
  • Wait for the evening and you have a cosy tablescape or garden decor.

In: DIY & Decor, Spring

join the club

Privacy Policy

You’ll Also Love

spring diy craftsSpring DIY Flower Frames

Reader Interactions

Leave a Reply Cancel reply

Your email address will not be published. Required fields are marked *

Recipe Rating


Next Post >

Fall Mom Capsule Wardrobe

Primary Sidebar

About Me
Hey there! Thanks for stopping by.

join the club

Categories

  • Budgeting
  • DIY & Decor
    • Spring
  • Meal Planning
  • Mom Essentials
    • Creativity and Leisure
    • Daily Mom Routine
    • Mom Outfit Ideas
    • Self Care
  • Organisation
    • All Organisation Posts
    • Kitchen Organisation Ideas
    • Pantry Organisation
  • Parenting
  • Recipes
  • Time-Management

Reader Favourites

7 Ways to Budget Groceries to Save Money

7 Ways to Budget Groceries to Save Money

  • Impressum
  • Privacy Policy
  • Cookie Policy
  • Terms & Conditions
  • GDPR Policy
  • Our Affiliations

Copyright © 2026 · Theme by 17th Avenue